Thursday, April 11, 2013

Tangent-Space Normal Mapping

Tangent-Space Normal Mapping


  One of my earlier blogs was about Normal mapping as a whole.  There, I talked about how normal maps work, and the effects that they add to your game.  What I didn't talk about was the difference of object space normal maps to tangent space normal maps.  Is there a big difference you ask?  Well yes.  Object space normal maps are great if you want to get that bump mapping effect on objects within your world.  There is one caveat however, if you morph them in anyway (animation), it looks hideous.  This is due to the matrix orientations for each vertex being in object space.  The way to apply a normal map, and be able to animate something without distorting the effect, is through tangent space mapping.


  The left image shows the matrix orientations per vertex for tangent space mapping, and the right image shows it for object space mapping.  The grey vector represents the surface normals, and the red, green and blue vectors represent the basis vectors.  Imagine the character is walking.  If your use tangent space mapping (left image), the surface normals will remain the same due to them being orientated in tangent space (local to the vertex).  If you use object space mapping (right image), the normals will be shifting differently from the boot, because they are oriented in object space mapping (local to the object).  This will create that distortion effect that I mentioned earlier.  To get around all this, you have to bring your object into tangent space.  This is done by multiplying the object space matrix, with the TNB matrix which you have to find.


  First off, you get your normal from your normal map (tangent space).  So that is done for you immediately.  Now, you need to find your tangent and bi-tangent (bi-normal).  To do this, you need to find the deltaU and deltaV of your vertex.  Imagine your origin is at U0,V0.  You can find the triangle edges E1 and E2 as a combination of your T (tangent) and B (bi-tangent).

                                                E1 = (U1 - U0)T + (V1 - V0)B
                                                E2 = (U2 - U0)T + (V2 - V0)B

  What you are calculating are the changes, or derivatives of U and V.  This only needs to be done once, so it can be calculated on the CPU.  You can then easily transform this into a matrix to represent your tangent and bi-tangent.  From there, you grab the inverse of this matrix (transpose) and then multiply it by your object space matrix.  This then results moving your object from object space, into tangent space.  From there, your normal mapping will look much better, especially when you are doing animations.


GamesCon

GamesCon


  On Tuesday, UOIT held their annual GamesCon event in the UB and ERC buildings.  Here, students showcase their game projects which they worked on throughout the year.  The event was held from 10am-5pm and students were set up in the main lobbies.  Other students, teachers and faculty members then came around and looked at each game which was produced.


 We showcased our game "Beat Dragon", where you use music as your weapon.  This is a game that we worked on heavily throughout our last semester, especially since we had to re-develop a lot of assets which were used from first semester.  The build we showed on Tuesday was good but admittedly, not nearly close to what we wish we had.  We had a lot of assets ready to be implemented and some great aspirations which sadly, never made it into the game.

  
  What we had was met with a very positive response.  People loved our game, it's gameplay and the concept which we had developed.  We wish we had more to show them, but for what we had, people thoroughly enjoyed.  They loved the ability to build music as you play through the game, and said they loved the visual style of our game.  This felt great, knowing that our hard work had not gone unnoticed.


  We showed our teachers the tech which we included within our game.  Shaders like bloom, and depth of field, VBO's, VAO's, and our own built graphics pipeline which was done by our programmer.  We got to show them our animations, levels, enemies and environmental objects which we had spent 3 months developing.  Then we showed our music, produced and recorded by our own audio producer.  We showed how we divided it into layers, and how they built on top of each other with our "Beat Timer" class within our game.  

  5pm came quickly, and it was time to announce the winners.  Sadly, we didn't win, but we were proud of what we had done.  We learned from our mistakes and what we needed to build on, but we also learned what we had done right, and what works well when working in a group.  Most Importantly, we enjoyed producing our game, as it was a valuable experience and one I will learn from.


Tuesday, April 9, 2013

Level Up

Level Up!


  On Wednesday April 3rd, 2013, my group (My First Ventilation Shaft) attended Level Up showcase at the Design Exchange in Toronto.  We were asked to showcase our game "Beat Dragon", where music is your weapon.

  I arrived early in the day, around 10 am.  I met my group members in the lobby, where shortly after, we were escorted upstairs.  At this time, only UOIT students were there, so we all sat around while they started to set up the monitors and stations where we would be presenting.  We sat around, touching up our game, making sure it was ready to present.  Half an hour later, students from U of T and OCADU started to come in.  We started to get our first glimpse at the competition.  Their games were impressive, but we used our own engines and they were using prebuilt ones, so we had a little extra hop in our step, so to speak.


  An hour later, and we were ready to head to our stations, and start setting up.  We managed to grab a TV down the middle of the main area, so we were in a perfect spot to show off our game.  We quickly got our game set up, and were ready to show it off to the world.  There was one problem however, it was hours until the doors opened.  So, we waited......


  After what seemed like days, 5pm rolled around and it was time to get to business.  People started flooding in; Individuals from the industry, attendee's relatives, children, and people off the street.  It got busy, fast.  We started showing off our game to anyone interested, and wanting to learn more.  We got so much positive feedback, and people who loved the concept of our game.  Even industry guys were intrigued with our game.  It was nonstop for the next 4 hours.


  I spent some time during these four hours, walking around and looking at other groups' games.  It was really incredible to see how unique and original the games being shown off were.  You can tell everyone had put in a lot of time and effort to make their game the best they could, and it showed.  One thing I can say from talking to the other participants from other schools was UOIT really teaches you everything you need to know when it comes to games, and seeing the look on people's faces when you tell them you built the engine yourself never gets old.  You can tell people understand how hard it is to build an engine from scratch.


  It was approaching 9pm, and people were starting to leave.  We were asked to pack up our stations, and hand in any remaining ballots to be counted.  Just as we finished packing, they started handing out the awards.  No one from UOIT won, but that isn't something to be get upset over.  We learn how to build games from the ground up, and we will be better for it when we graduate.  However, Knescha Rafat did win a nice gaming headset, so he was pretty happy about it.

  With everything done, and it getting close to 10:30pm, we decided to call it a night, and head home.  It was a thoroughly enjoyable experience, and if you ever have the chance to go, I urge you to do so.  I know we will be aiming to attend next year.  Here's to hoping!

Sunday, April 7, 2013

SSAO: Screen Space Ambient Occlusion

SSAO: Screen Space Ambient Occlusion


  Screen space ambient occlusion is technique which globally illuminates the scene in screen space.  It is done through approximating the occlusion function on visible surfaces by sampling the depth of neighboring pixels. This is all done in screen space; hence SSAO (Screen Space Ambient Occlusion).  There are many different ways to achieve SSAO, but I will be focusing on the technique used in Starcraft 2.


  In the first pass, the linearized depth and surface normals are rendered to a texture.  In the second pass, a fullscreen quad is rendered and multiple samples are taken from neighboring points to the current pixel.  They are sampled and then are offset in 3D space from this pixel.  They are then converted back to screen space to compare and sample the depth found in the first pass.  This is done within the fragment shader.  This allows us to see if the sampled point's depth is farther or closer than the actual point's depth.  If it is closer, then there is something covering the sampled point.


  The occlusion function gives off zero occlusion if the depth delta is negative, high occlusion if the depth delta is small, or the occlusion falls back to zero beyond a certain depth delta, where the depth delta is the difference between the depth of sample point and the depth sampled at the point.


  After calculating the SSAO, you need to blur your scene in order to reduce the noise within the picture.  This can be done with either a 2D gaussian blur or a 1D bi-lateral blur, one in the X direction, one in the Y for a total of 2 passes.  You will also want to retain the sharp edges within your scene.  This is done by sampling a pixel, and then determining whether the pixel's depth is below a certain threshold, or if the dot product of the normal of the sample pixel is below a certain threshold.  If it is, then the kernel has a zero weight factor on the current pixel.


  With all of this implemented, you will have then successfully developed SSAO within your game.  You can then use SSAO combined with other effects to really make your game pop, and achieve that high quality visual style.

Saturday, April 6, 2013

Displacement Maps

Displacement Maps


  Displacement maps are very similar to Normal maps except for one difference: they actually deform geometry.  If you recall my blog on normal maps, I talked about how the normal's were used with lighting to create depth which gave geometry detail without having to actually deform it.  Displacement maps work very similarly, except now you are deforming geometry to the given map, and are creating the detail through this displacement.


  In the above picture, the ground is mapped with the same texture, except one uses normal mapping, and the other uses displacement mapping.  The top one uses displacement.  As you can see, the bricks on the ground are generated through moving the necessary geometry specified by the displacement map.  The normal mapped ground creates detail through the normal's casting shadows, creating depth and giving the look of raised bricks.  
  
  The displacement is done in the vertex shader.  The shader reads in the necessary vertices from the map, and then displaces the vertices accordingly.


  You can also do displacement mapping through ray casting.  With this, you need the coarse mesh, displaced texture and assume that the displacement is a negative displacement.  You find the intersection point and then find the displaced texture coordinate.  Per vertex, you determine the eye ray, light ray etc. in tangent space, and per fragment you find the intersection of the eye ray with the height field, (offset the surface point and texture coordinate) and add the shadow ray to light source.  You walk along the ray in small steps, and interpolate the height field linearily.


  The interpolation is important as you can see in the following pictures.  The top picture is through a piece-wise constant interpolation.  Notice how it seems to be chopped into levels, and isn't very smooth with no discernible shape.  The bottom picture is through a piece-wise linear interpolation, and is much smoother and more accurate to the actual displacement map.  You can make out a face in the bottom picture.  


  Displacement mapping is a great way to create detailed objects within your game through actual manipulation of the geometry.  The only downside is that your objects need to be much higher poly rather than objects that are normal-mapped.  The more detail, the higher the poly count.  However, if your game can handle it, the payoffs are worth it.


Thursday, April 4, 2013

Normal Mapping

Normal Mapping


  Normal mapping is a procedure in which you can create a lot of detail within a low-poly model.  It creates quality and visually appealing graphics without having to create huge taxing models which can slow down your game.

  The first means of normal mapping is creating a highly detailed model.  With this model, you would show all the fine detail that you want if your final model.  You would then take a second model, however you would create a significantly lower detailed model.  This model would however have to be similar to the high detailed model, or else the normal map will not be applied correctly.  This is known as creating a high-poly and low-poly rendition of your character.


  After this is done, you would then create a normal map.


  This is what a normal map looks like.  The reason you see a lot of blue and red/purple is because this map shows the normal's of the model.  With this data, when you apply a normal map to a low poly model, it applies the normal's to the necessary geometry, and with lighting, creates depth and shadows showing fine detail.  However if you go right up to the model itself, you will actually see that the model's geometry has not changed at all.  This is why lighting is key, because without it, you would not see the detail that the normal map creates.


  Here, you can see a low-poly model, a high-poly model, and then the low-poly model with the normal map applied.  You can't even tell the difference between the low-poly and high-poly model and the normal-mapped model is not nearly as expensive in computing power as the high-poly model.  This is what makes normal-mapping so fantastic, and so helpful.  You can create these amazingly detailed models without destroying your frame rate.

  Since this is an in-expensive way to produce high-quality models, and creates visually appealing graphics, it is used extensively in games today.  You can normal map anything, and in the end, you get a gorgeous game.


Tune in for my next blog!

Tuesday, April 2, 2013

Depth of Field

Depth of Field


  Depth of Field is help adds depth to your game, through different focal planes.  There are 2 different camera models, Pinhole and thin lens.


  Pinhole (shown on the left) lets a single ray through, which always hits the object, always creates an in focus picture.  While a scene might be in 3D space, it might appear flat since there is no depth within the field of view.  The thin lens model casts out multiple rays through a lens, which are then redirected towards the object.  If the rays come together to a single point and fall on the object at that position, it is considered to be in focus and falls on the focal plane.  If the rays hit it at a point of where they are scattered, they all attribute to image and create a circle of confusion.  This circle of confusion describes how blurry the object is.  The bigger the circle, the more out of focus it is.  


  The above picture shows 3 gnomes in a forest.  You can see the middle gnome is perfectly in focus, thus would fall on the focal plane.  The gnome closest to us is quite blurry and would fall on the Near Plane.  It's circle of confusion would be quite large, hence the extreme amount of blur.  Lastly, the gnome off in the distance would fall on the far plane, and would also have a large circle of confusion.  These planes help convey the depth of the image, and the distance each gnome has in the scene.


  The blur is created by downsampling the in focused image and then applying a gaussian blur.


  To do this for your game, you would take the circle of confusion, set a centre sample, and then randomnly sample parts within the circle using either Stochastic Sampling or Poisson distribution (Poisson is the preferred algorithm).  You then apply this sample to a filter.


  The filter is then sized based on whether or not the point is in focus or blurred.  The more blurred it is, the bigger the circle of confusion and pixels it affects on the kernel.  If it is in focus, it will affect a single pixel within the kernel.


  The end result is a photo-realistic image which conveys the proper depth within the scene, and accentuates the object which is the main focus.  Tune in soon for my next blog post!

Tuesday, February 12, 2013

Post-Processing Effects

Post-Processing Effects!


  Our last lecture went over Post-Processing Effects.  Through these effects, you can create different tones, highlights and visuals which add appeal and feeling to your game.  One of these effects which we went over in detail was bloom.  Through bloom, you can brighten up your scene and create a warm toned atmosphere.


  The above image shows the same scene, one with classic rendering, the other with HDR rendering.  with the HDR rendering, you notice the bright areas within your view become brighter.  You also see this hazy, colour seepage within the image.  This is due to you taking the same image, applying different effects to them, and then adding all the effects together.  For bloom, you first take your image and raise the brightness within it, making bright areas even brighter.  Then you take your original scene again, down-sample it to create a blurry, pixelated scene.  Finally, you take your original scene without any HDR rendering down to it, your bright scene and your blurry scene, and you add them together to get a basic bloom effect.  

  We also talked about Cel-shading.


  You achieve cel-shading by creating a range of numbers for colour.  If a value for a pixel falls within a certain value, you output one colour, if it falls within another, you output a different colour.  It works similar to a gradient, and there are no colour blendings between these colours, it is either one colour or another. 

  If a value falls below a certain threshold, you output black.  Finally, you highlight the edges in black, which really pops your scene.  This effect is simple, but can really add character to your game.

  Polishing your game with post-processing effects creates beautiful visuals, and helps distinguish the look of your game.  There are so many things you can do with post-processing, and I look forward to learning more about them.

Sunday, February 3, 2013

Shadow Mapping

Shadow Mapping 


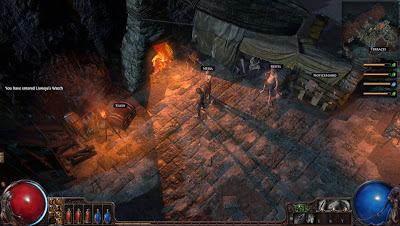
  Last week, we talked about Shadow maps.  Shadow maps create realistic shadows within the game, and are computationally light.  They add great effects, and can allow you to hide imperfections or improve game play, such as hiding an enemy within the shadows.  They also allow you to create depth, giving it a more visual appealing look.  Below, I will show you some key shadow maps done in a game called "Path of Exile".


  Now, first thing you might notice, is there are a TON of shadows in this screenshot.  This seems to be a common theme throughout the game, as it goes for this dark feel.  Here, you can see shadows being casted by me, the merchants, and the different objects within the scene.  You can also pick out which light sources are casting these shadows.  I am currently standing quite close to the fireplace, and that is casting a very long shadow behind me.  However, I have a second, very faint, shadow being casted by the torch beside the treasure chest.  You might not be able to make it out in the screenshot, but it was very noticeable whilst playing the game.  With these multiple light sources, you achieve some really cool looking shadows and effects within the game.


  Here, I am in a cave.  You can see a  large light eminating from me in a circle, which will increase and decrease in radius based on how much HP you have.  You can see the rock pillars casting large shadows related to the position of where you are.  You are also unable to see what is outside of the circle of light, because if you were to look from your point of view, you would not be able to see what's behind the rock wall.


  Finally, here I am outside.  The sun is the biggest light source in this screen shot, and you can see the shadow that I am casting in the opposite direction of the light source.  You can also see the reflection of the sun off the water, at the bottom of the cliff.  There are also light shadows being casted by the grass, but you can't really make it out in this screenshot.

  Shadow mapping allows us to emphasize depth, create a more visual appealing game and improve realism within games.  Look forward to my next blog post on post-processing effects!


Saturday, January 26, 2013

Lighting and Shaders!

Lighting and Shaders!

  
    Well, last week we were talking about lighting and shaders, as well as the different texture maps which you can use (bump maps, displacement maps, etc.).  I went and played CS: GO, looking for these within the game (as per requested).  Below are some screenshots that I took, showing some of the many places within the game that these effects and maps are used.

                                                                 (Dat bloom...)

    Here, we are at the starting position on one of the maps (Vertigo).  The most obvious thing here is the use of the bloom lighting effect.  This brightens up the concrete where the sun is shining, and you can see softer shadows, as well as colour seepage around the counter-terrorists and the various objects on the building.  You can also see the shadows of the other counter-terrorists.  I would assume this affect would be done through shadow mapping.


   This is another example of shadow mapping, but this time the shadows seem to have a harder edge compared to the shadows which were being cast from the picture above.  We can also see a great wooden texture on the wood plank in the upper left part of the screen.  The detail with the darker knots and the wooden grains really pop out.


   This is a great example of some bump mapping being exhibited.  Here, you can see a great texture on the barrels and the garbage bin.  Even though we are a good distance away, you can still see the dark knots in the wooden planks in the top right, re-iterating my point about how much detail goes into these bump maps.  There is also some soft lighting on the ground in the top left, indicating that there is another light source (in this case, a ceiling light).

    These simple processes add so much feeling to a game and I look forward to implementing them within ours!

Thursday, January 17, 2013

Shaders: Stylizing Beat Dragon!

Stylizing Beat Dragon!


    Our game is called Beat Dragon, which is an aerial-rhythm game.  You play as Jiggy, the musically enchanted dragon, who collects symbols representing different attacks (wings, your tail and clapping).  Each attack creates different sounds, which in total create a song.  You want to hit these attacks, which keep up your flow (health) and reach the end of the level.  At the end of each level, you combat a boss.

Before:

    At the end of last semester, our game currently looked like the following:
    As you can see, this is a basic prototype of the game, with not much in the way of shaders or special effects.  It has flat colours, and a pure black background.  

After:

After some work in photoshop, I managed to turn another screenshot of the game into what you see below:
    The first thing I did was put water and clouds into the background.  After that I started adding some special effects.  I burned in some texture to the canyon walls on either side, to give the walls more of a rocky feeling.  I then created shadows for Jiggy, the giant dragon, the canyon walls, and the clouds in the water's surface.  After that, I added some shadows on the giant dragon to accentuate and make it pop.  I then added a film grain to the entire screenshot, to give it a lighter feel.  Finally, I added a lens flare, for the reflection of the sun in the water and it's light bouncing off of the surface and catching the player's eye.  All in all, I felt this gave the game a much lighter and joyful feel to it, something which is what we are aiming for in our finished game.